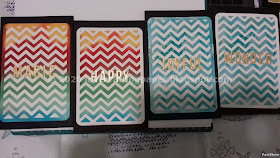
in questo periodo sto riscoprendo tantissimo materiale che ho comprato negli ultimi anni ma che non ho mai usato. Probabilmente sta capitando anche a voi. Dobbiamo lavorare con quello che abbiamo a casa, farcelo bastare e cercare nuove idee con gli stessi materiali o ricordarci che tanto tempo fa abbiamo comprato un articolo che ci faceva impazzire, ma che poi per qualche motivo abbiamo dimenticato in un cassetto.
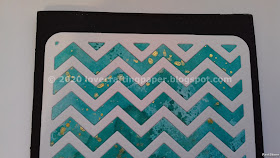
Ecco, i quattro biglietti che vi mostro ora li ho realizzati con una fustella di un set per pocket pages che avevo comprato, tra l'altro, scontato e quindi con doppia soddisfazione. Solo adesso, però, mi sono accorta di quello che posso fare con questa fustella.
Good evening everybody,
in this period I am rediscovering a lot of stuff that I have bought during these years but I have never used- Maybe this is happening to you too. We have to craft with the things we have at home and find new ideas with the same stuff or remember that a lot of time ago we bought an item that drove us crazy, but that was quickly forgotten in a drawer.
Well, I made the four cards I am going to show with a die that was included in a set for pocket pages. I bought it a few years ago. It was for sale, so I was happy twice. But I have suddenly realized just now what I can do with it.
Ho fatto due coppie di biglietti, una arcobaleno e una blu, e usando le fustellate positive e negative.
Prima ho creato uno sfondo arcobaleno con i tamponi Distress, su cui ho spruzzato un po' di acqua, poi ho fatto asciugare bene e ho fustellato questo schema a zigzag nel cartoncino arcobaleno e in uno bianco.
Ho creato anche uno sfondo blu sempre con i Distress e ho seguito la stessa procedura.
Ho creato dei cartoncini dorati con diverse sfumature di acquerelli e da lì ho fustellato delle lettere per formare delle parole che ho incollato sui biglietti.
Come sempre, alla fine del post troverete le foto delle fasi di lavorazione.
I made two couples of cards, a rainbow couple and a blue couple, and used positive and negative cuts.
First I made a rainbow background with Distress inkpads. I sprinkled some water on it, then I let it dry and die cut this zigzag pattern from this rainbow cardstock and from a white one.
I made a blue background too with Distress and repeated the same steps.
I used different hues of gold to colour some cardstocks and die cut some words that I put on the cards.
At the end of the post you will see the steps of the making, as usual.#1
Questo è il primo biglietto arcobaleno.
#2
#3
Adesso vedrete i due biglietti blu.
Now you'll see the two blue cards.
#4
Ecco i biglietti tutti insieme.
Here are all the cards together.
Adesso vi mostro come li ho realizzati.
Now I show you how I made them.
Ho tagliato anche una parte del cartoncino che ho dipinto di oro. Vi farò vedere presto cosa ho fatto con questi pezzi.
I die cut also some of the cardstock I Painted with gold. I'll show you soon what I made with these pieces.
Per creare gli sfondi arcobaleno e blu ho messo dell'inchiostro su un blocco di plexiglass e ho spruzzato dell'acqua. Poi ho "stampato" il plexiglass sul cartoncino.
To make the rainbow and blue backgrounds I put some ink on plexiglass and sprinkled some water. Then I used plexiglass to "stamp" on the cardstock.
Partecipo alle sfide con il biglietto n° 1.
I join the challenegs with card #1.
Sfide / Challenges:
Alphabetchallenge, 10th April challenge, A is for ATG
Avenue Create 613, Challenge #232, ATG w/optional twist Use Geometric papers
Carabbie Creative Moments, Challenge #188, ATG / optional twist Something to look forward
Cardztv, Challenge #112, ATG
Colourcrazychallenge, 10th April challenge, week 14, ATG
Craft-alnica, Challenge #258, Fussy cuts
Happylittlestampers, 9th April challenge, ATG with Dies
Heroarts challenges, Challenge #4, Self care
Qkrstampede, Challenge #393, ATG
Scrapbookingitalia, 6th April challenge, Blue (Card #4)
Wordartwednesday, Challenge #434-435, ATG


What a great inlaid die cut series! Each version is beautiful and I love the fact that you get two cards from each one! Awesome! Thanks so much for sharing these with us for our 10th Anniversary Celebration over on the Alphabet Challenge Blog! Ciao! Stay Safe!
RispondiEliminaRachelle : )
Cara Mariangela, non mi resta di dire solo una parola, vedendo tutto!!! Bravissima.
RispondiEliminaCiao e buona Pasqua con un forte abbraccio e un sorriso:-)
Tomaso
Buon pomeriggio, Tomaso,
Eliminasono contenta che ti piacciano anche questi nuovi biglietti! Ormai ne ho accumulati tantissimi. Non vedo l'ora di poterli spedire di nuovo a tutte le persone a cui voglio bene e per un attimo regalare un sorriso.
Ti auguro una buona Pasqua!
Mariangela :-)
Love the way you have used the die with inlays - and the colours are fabulous. Thank you for sharing your creative process, and thank you for joining us at The Alphabet Challenge xx Lynda DT
RispondiEliminaChe belle le tue card! Mi piace un sacco questo effetto zig zag!
RispondiEliminaGrazie per aver giocato con noi di Scrapbookingitalia
Your cards are just perfect for our challenge! Thanks for the awesome submissions and the tutorial! We appreciate that you accepted the challenge this month at 613 Avenue Create! We look forward to seeing more from you this month!
RispondiEliminaHugz,
Chana Malkah, Owner
FABulous cards and love your chevron designs..
RispondiEliminaThank you so much for joining in with us at 613 Avenue Create..hope you will play along again..
Luv CHRISSYxx
Beautiful diecutting cards. Love the colours and gold combinations.
RispondiEliminaGoga Craft-alnica
This is FABulous! Thanks so much for sharing with us in the Happy Little Stampers April Anything Goes With Dies challenge! We appreciate you joining us this month!
RispondiEliminaHugs,
Leslie, HLS Dies Team
Love To Scrap 2
Bellissima idea!
RispondiEliminaGrazie per aver giovato con noi!
Claudia DT Scrapbookingitalia